
From this article, you will learn how does the Class bookings report works and what options does it offer. Check the list of registrations for classes in the selected time period, analyze which of them your members attend most frequently and which days of the week are the most popular in the schedule. Also check which registration channel is most used, whether it is the application, the Member’s area or a traditional registration by an employee.
1. Where to find and how do the report look?
Switch to the Reports -> Classes -> Class bookings:

2. What filters are available?
All available filters will be shown after clicking on the More filters option:

The following filters are available:

A) Groups/Clubs – this filter is available in case of clubs in chain, allows you to group clubs by aggregates in accordance with the settings in the Club Settings -> Aggregates tab
B) Club – visible for the clubs in chain. You can choose one, few or all clubs from the list
C) Date – choose data period, for which you would like to check class bookings; in default, today’s date is chosen
D) Class type – you can filter only chosen class types, e.g. zumba or crossfit
E) Instructor – you can filter classes assigned to the selected instructor
F) Member – analyze registrations for a selected member
G) Day of week – search for classes taking place on a selected day of the week
H) Attendance – check only those bookings where attendance was/was not marked
I) Registration channel – you can find bookings that were made by members from the Member’s area, mobile app, or by an employee
J) Tag – you can also filter the results by the tags assigned to Members’ profiles
3. What columns are available in the report?
After choosing proper filters and clicking on the “Search” button, a summary is available and searching results are visible in the form of a table with the following columns:

- Club – column available in case of clubs in chain
- Class name – e.g. Crossfit or Zumba
- Instructor – employee assigned to the classes as an instructor
- Number of classes with bookings – the number of only those classes/tiles on the schedule in the selected date range that have registrations/one-time entries
Additional columns can be added to the searching results. In order to add more information to the table, you can use the “+ Select additional information” button:

Choose additional columns and grouping types from the list:
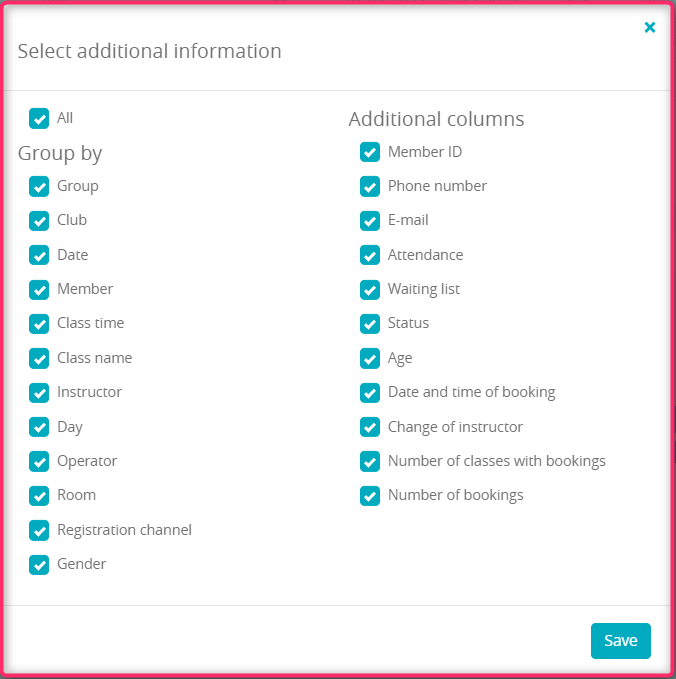
- Date – date of the classes
- Member – first and last name of a member – you can easily enter their profile, as it is linked in this column
- Class time – the time at which classes begin
- Day – the day on which classes take place
- Operator – the employee who registered for the classes
- Room – the room in which classes are held
- Registration channel – place to register for classes, e.g. Member’s area, Employee
- Gender – member’s gender
- Member ID – member’s ID number
- Phone number – member’s phone number
- E-mail – member’s e-mail address
- Attendance – member’s attendance at classes
- Waiting list – information whether the member is on the waiting list for classes
- Status – member’s status
- Age – member’s age
- Date and time of booking – the time of member’s registration for the classes
- Change of instructor – information whether the instructor has changed for the selected classes
- Number of bookings – total number of bookings
4. Options available in the Sale in details 2.0 report
Searching results can be exported to the Excel file:
![]()
Using the Filter templates button you can save frequently used filters, which will ease the process:
![]()
After choosing the grouping by the member option, a new button called Additional options will be shown:

The following options are available:
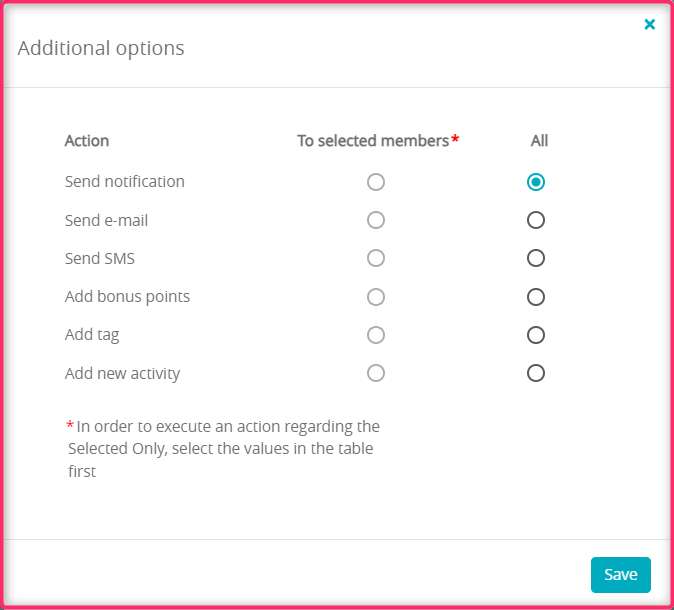
- sending notifications
- sending e-mail messages
- sending SMS messages
- adding bonus points
- adding tags in bulk
- adding new CRM tasks.